Do you need to test your pool water, but are not sure how to use pool test strips correctly?
This article will walk you through what to expect from using test strips, how to best use them for an accurate reading, and how to read the test strip results against the provided color chart.
Prefer to skip ahead?
Why Use Pool Test Strips?
While pool testing strips aren’t quite as accurate as liquid test kits, they’re certainly far quicker and more convenient to use.
Most pool test strips also allow you to test the five main markers of pool chemistry:
- pH level
- Total alkalinity
- Free chlorine
- Calcium hardness
- Cyanuric acid
Some pool testing strips (specifically, 7-in-1 strips) also include other parameters like total chlorine or bromine levels.
How to Use Pool Test Strips (6 Steps)
No products found.
While there are many different brands of pool testing strips, this process will be largely the same regardless of which one you own.
Here’s how to use pool testing strips to get a reading on your water:
1. Take a Strip from the Packet
You’ll likely have a pack of 50 or 100 test strips, but you’ll only need a single strip for each test you perform.
Go ahead and remove one strip, carefully pinching the white end of the strip so as not to disrupt the chemical agents on the colored sections. Mishandling a strip will likely compromise the test results.
Finally, ensure the lid is closed after removing strips from the bottle. Leaving them exposed to air for long periods may compromise their reliability, especially in humid environments.
2. Briefly Dip the Strip Into Your Pool
While still pinching the white end of the strip, stand at the edge of your pool and submerge it in the water.
Ideally, this should be away from any stagnant areas of your pool, closer to an active return jet. The better circulated your water, the more reliable your results are going to be.
You don’t need to go too deep here, but the entire strip should be submerged for a few seconds. As a general rule, if your hand isn’t getting wet during this process, you’re probably not doing it right.
Alternatively, if you prefer, you can grab a small sample of water from your pool and submerge the strip into that. Either way works.
3. Wait a Few Seconds for it to Work
After removing the strip from your water, do NOT shake or blow it.
The more hydrated the colored sections are, the more reactive they will be to the chemical process that follows.
Instead, place the wet test strip on a nearby flat surface, and allow up to 30 seconds for the color-changing chemicals to finish working. You should clearly be able to see as they change to lighter or darker shades.
Once the colors have settled, you can go ahead and compare them against the color chart on the test strip bottle.
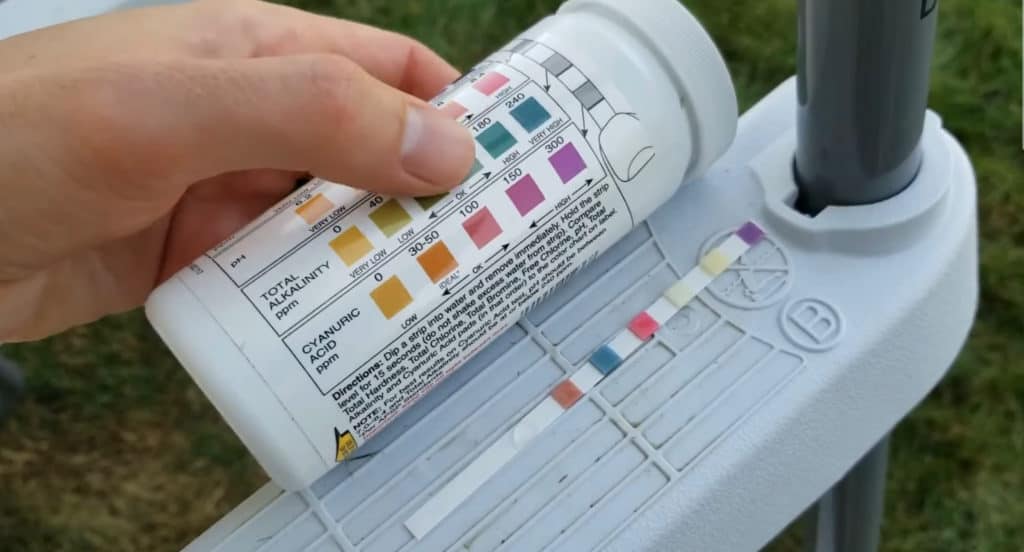
4. Compare the Strip Against the Color Chart
The color chart will either be printed on the back of your strip container or provided separately in a leaflet.
You will need to hold your test strip up against this chart in order to compare the shades of colors for the individual parameters, such as pH, total alkalinity, free chlorine, and cyanuric acid.
It helps to place the colored square directly over the chart, moving left and right until you find the closest match.
Note: See the section below for a more detailed explanation of how to interpret the color chart on your test strip bottle.
5. Throw the Strip Away (Never Reuse)
Pool testing strips are a one-time-only deal.
Once you’ve dripped a strip into water, the chemical reaction on the colored squares takes place, and the results of that test are final. These colors will also eventually fade.
So, after taking a reading, always discard the strip. Never place a used strip back into the bottle you took it from.
6. Repeat the Test at Least Every Week
Your pool chemistry is always on the move.
Like dominoes, when one chemical marker changes so eventually do another, so it’s important to stay on top of fluctuations through regular testing.
As per our pool maintenance checklist, we recommend testing twice weekly but you can get away with testing just once per week. You should also be testing after heavy contamination, such as storms or “little accidents” in the water.
How to Read Pool Test Strip Results (Color Chart)
The number of colored squares on your test strips tells you how many different parameters your kit tests for.
In other words, a 5-way test strip will have 5 colored squares, a 7-way test strip will have 7 colored squares, and so on.
The same goes for the provided color chart.
This chart will give you a range of color shades for each of the parameters it tests for. Each color represents a different parameter, and the various shades of that color represent how concentrated it is in your pool.
For example, if a well-balanced pH is represented by the color orange:
- Very light orange (bordering yellow) would indicate a low pH level
- Very dark orange (bordering red) would indicate a high pH level
Placing the relevant colored square directly over the chart will help you pinpoint exactly where it sits in that range.
Aside from just “low or high”, most color charts also indicate a number and a suitable range to shoot for. This tells you what needs to be lowered or raised in your pool, and by roughly how much.
Conclusion
Despite being slightly less accurate than liquid drop kits, pool test strips offer a cheaper and more convenient way to keep tabs on your pool chemistry.
All it takes is a quick dip into your pool water and a few seconds of your time, and you’ll have a comprehensive reading on all the primary pool parameters. Yes, it really is that easy!