Ahh, so you need to to drain the water from your above ground pool but you don’t know how to do it?
Or maybe you do know how to drain it, but you want to know the fastest and most efficient way to get the job done?
Either way, this article has you covered.
Why Drain Your Above Ground Pool?
Before we go through the steps, it’s important to discuss when you should drain the water from your pool, as it’s not always a good idea.
The most common scenarios are as follows:
- Replacing your pool liner. A compromised pool liner can be repaired without having to drain the water, assuming you’re using a reputable underwater repair kit. But replacing a liner is a different story, and this will always require you to completely drain your pool.
- Replacing stale water with new. There’s little point putting fresh water in without first removing the old. Of course, it should be noted that your water shouldn’t need replacing if the correct pool care is applied, and that includes properly closing or winterizing your pool.
- Fixing your pool chemistry. Most chemical imbalances can be solved without having to drain your pool, but chlorine lock is an exception to the rule. This is due to excess pool stabilizer or a pH imbalance, and can only be resolved by replacing the water.
- Moving your pool to a new location. It makes little sense moving an above-ground that holds water, not to mention the risk of damaging the pool if you try to do so. Whether you’re moving it a few feet or a few kilometres, draining is necessary.
- Storing your pool. If you need to pack things away for the winter or just need to free up space in the yard, removing the water is a must.
How To Drain An Above Ground Pool (Step-By-Step)

Depending on the size of your pool, the draining process can take as little as an hour and as long as half a day while you wait for the water to empty.
With that being said, preparing your above-ground swimming pool for draining is still pretty straightforward and can be broken down into a series of simple, easy to follow steps.
Step 1: Plan Where The Water Will Go
Dumping thousands of gallons of water can obviously take a toll on the landscape around your pool, so it’s important to consider where exactly that water will be channeled and pooled (no pun intended).
Most people tend to let the water out into their own yard, and that’s fine as long as you can be sure the water chemicals won’t damage your plants.
If you’re planning on using gutters or storm drains, however, you’ll want to check whether they can handle large volumes of water, and whether or not using them for this purpose violates local regulations.
Step 2: Pick Your Method
There are several methods you can use to drain your pool, but only two of those really make sense for an above-ground pool. These are using an electric pump or a traditional garden hose.
To help you make a decision about which way to go about this, let’s take a look at both methods and weigh up the pros and cons for each.
A Garden Hose

Draining your pool using a traditional garden hose is the cheapest approach, but it’s also much slower than using a pump so you’ll need to account for your time as well. Of course, the larger the hose diameter, the more water it can move per hour.
Keep in mind that a hose wont be able to drain everything and you will be left with at least a few inches of water. This is not an issue if you’re just fixing a chemical imbalance, but most other scenarios will require that all water is emptied out.
If that’s the case, you will likely need an electric pump to finish this even if it is just to get those last few drops of water out. Otherwise, there’s no reason to consider a pump aside from simply getting the job done faster.
An Electric Pump

A submersible electric pump is designed to move water at a much faster rate compared to a garden hose, and it will also empty your pool almost entirely.
The downside to this approach is that not only do you need to invest in an electric pool pump (which can be expensive), but you’ll also take a hit on your electricity bill, especially if you’re using a pump for the whole process. The smaller the pump, the lesser the hit.
If you need to move the pool, replace the pool liner, or completely switch out the water with a fresh batch, then you’ll ultimately need to use a pump. Even then, you may decide to start with a hose and finish with a pump to save on electricity costs.
Step 3: Start Draining The Water
By now you should know which approach to use for your specific use case, whether that be using a hose, an electric pump, or a hybrid of both.
To start draining the water with a hose:
- Connect one end of the hose to your faucet
- Put the other end in your swimming pool
- Turn on the water so it flows into the pool (removes air from the pipe)
- Detach the end of hose from the faucet and immediately lower it to the ground
- Watch as the water flow reverses and starts draining the pool
To start draining with an electric pump:
Well, since all pumps have their operational manual there’s no need to cover the specific steps here. It’s simply a case of following the instructions that come with the device and you’re good to go.
Again, this can be used in combination with a garden hose drain, or right from the start if you’re in a hurry to get things done and money isn’t an issue.
Step 4: Remove The Excess Water
As I mentioned in the last step, a garden hose drain will cease to work once the water reduces to a few inches in depth. In many cases, you probably won’t need to drain further than this anyway.
Otherwise, it’s recommended that you use an electric pump to drain the rest of the water. If you’re on a tight budget and have no way to get your hands on a pump, scooping the water out manually is another option, albeit slow and painful.
Of course, if you’re using a submersible electric pump from the start, this step is irrelevant as a pump will be able to drain all the water.
Step 5: Dry Out Your Pool
The last step applies if you’re replacing the liner or storing the pool away.
In this case, drying is absolutely critical in order to prevent algae and other nasties from making a home in your pool. Not only does this lead to a health risk but it also creates more work later when you have to fix the problem.
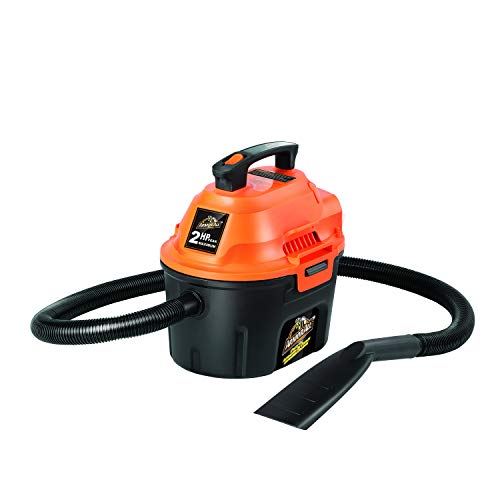
As far as drying your pool, you have a choice to make. You can either use a wet/dry vacuum (like the one below), or simply wait for it to air-dry by leaving the pool outside until it becomes dry to the touch. Be careful not to do this in extreme conditions as it can cause serious damage to your liner.

Once again, if you only plan to move the pool, fix a chemical imbalance or replace your water, completely drying your pool is unnecessary.
Conclusion
Draining your pool is one of those jobs you tend to put off for another day, but if you follow the steps outlined in this article, you’ll have it done before you can say summer-time swim.
If you have any questions about this process, or you need clarification on any of the steps I’ve outlined, please fire away in the comments!
Share on Pinterest

